

Creating and uploading custom images
Overview
Custom images let you bring your own operating system or golden image to CloudPe and boot virtual machines from it. You can add an image two ways: upload a disk file directly from your browser, or have CloudPe fetch it from a URL you provide. Supported disk formats are qcow2 and iso.
Every custom image belongs to a project and a region, and carries the OS and firmware metadata you set at ingestion time. That metadata is what tells the platform which driver disk to attach and whether to boot the image with UEFI or BIOS firmware, so filling it in correctly is the difference between an image that boots first time and one that stalls at the installer.
Custom images appear in the Images page under the STORAGE group in the dashboard, and become selectable when you create an instance in the same region.
Before you start
- Permissions: adding or editing an image requires
images:create. Removing one requiresimages:delete. - Project and region: images are scoped to the project and region you create them in. An image name must be unique within a project — a second image with the same name is rejected.
- Source file: have either the disk file locally (qcow2 or iso) or a reachable URL that CloudPe can download from.
- OS and firmware details: know the OS family and version of the image and whether it expects UEFI or BIOS firmware. Firmware belongs to the image and is inherited by every VM built from it — there is no per-VM override.
- Identity verification: if you intend to share the image into VDI sessions, your account must have completed identity verification first.
- Windows ISO installs: the install target disk is virtio. During Windows Setup you will need to use the load-driver option and browse the attached driver disk before the installer sees the disk.
Steps
Add an image
Open Images from the STORAGE group in the sidebar. The Custom Images page lists every image in the current project and region.
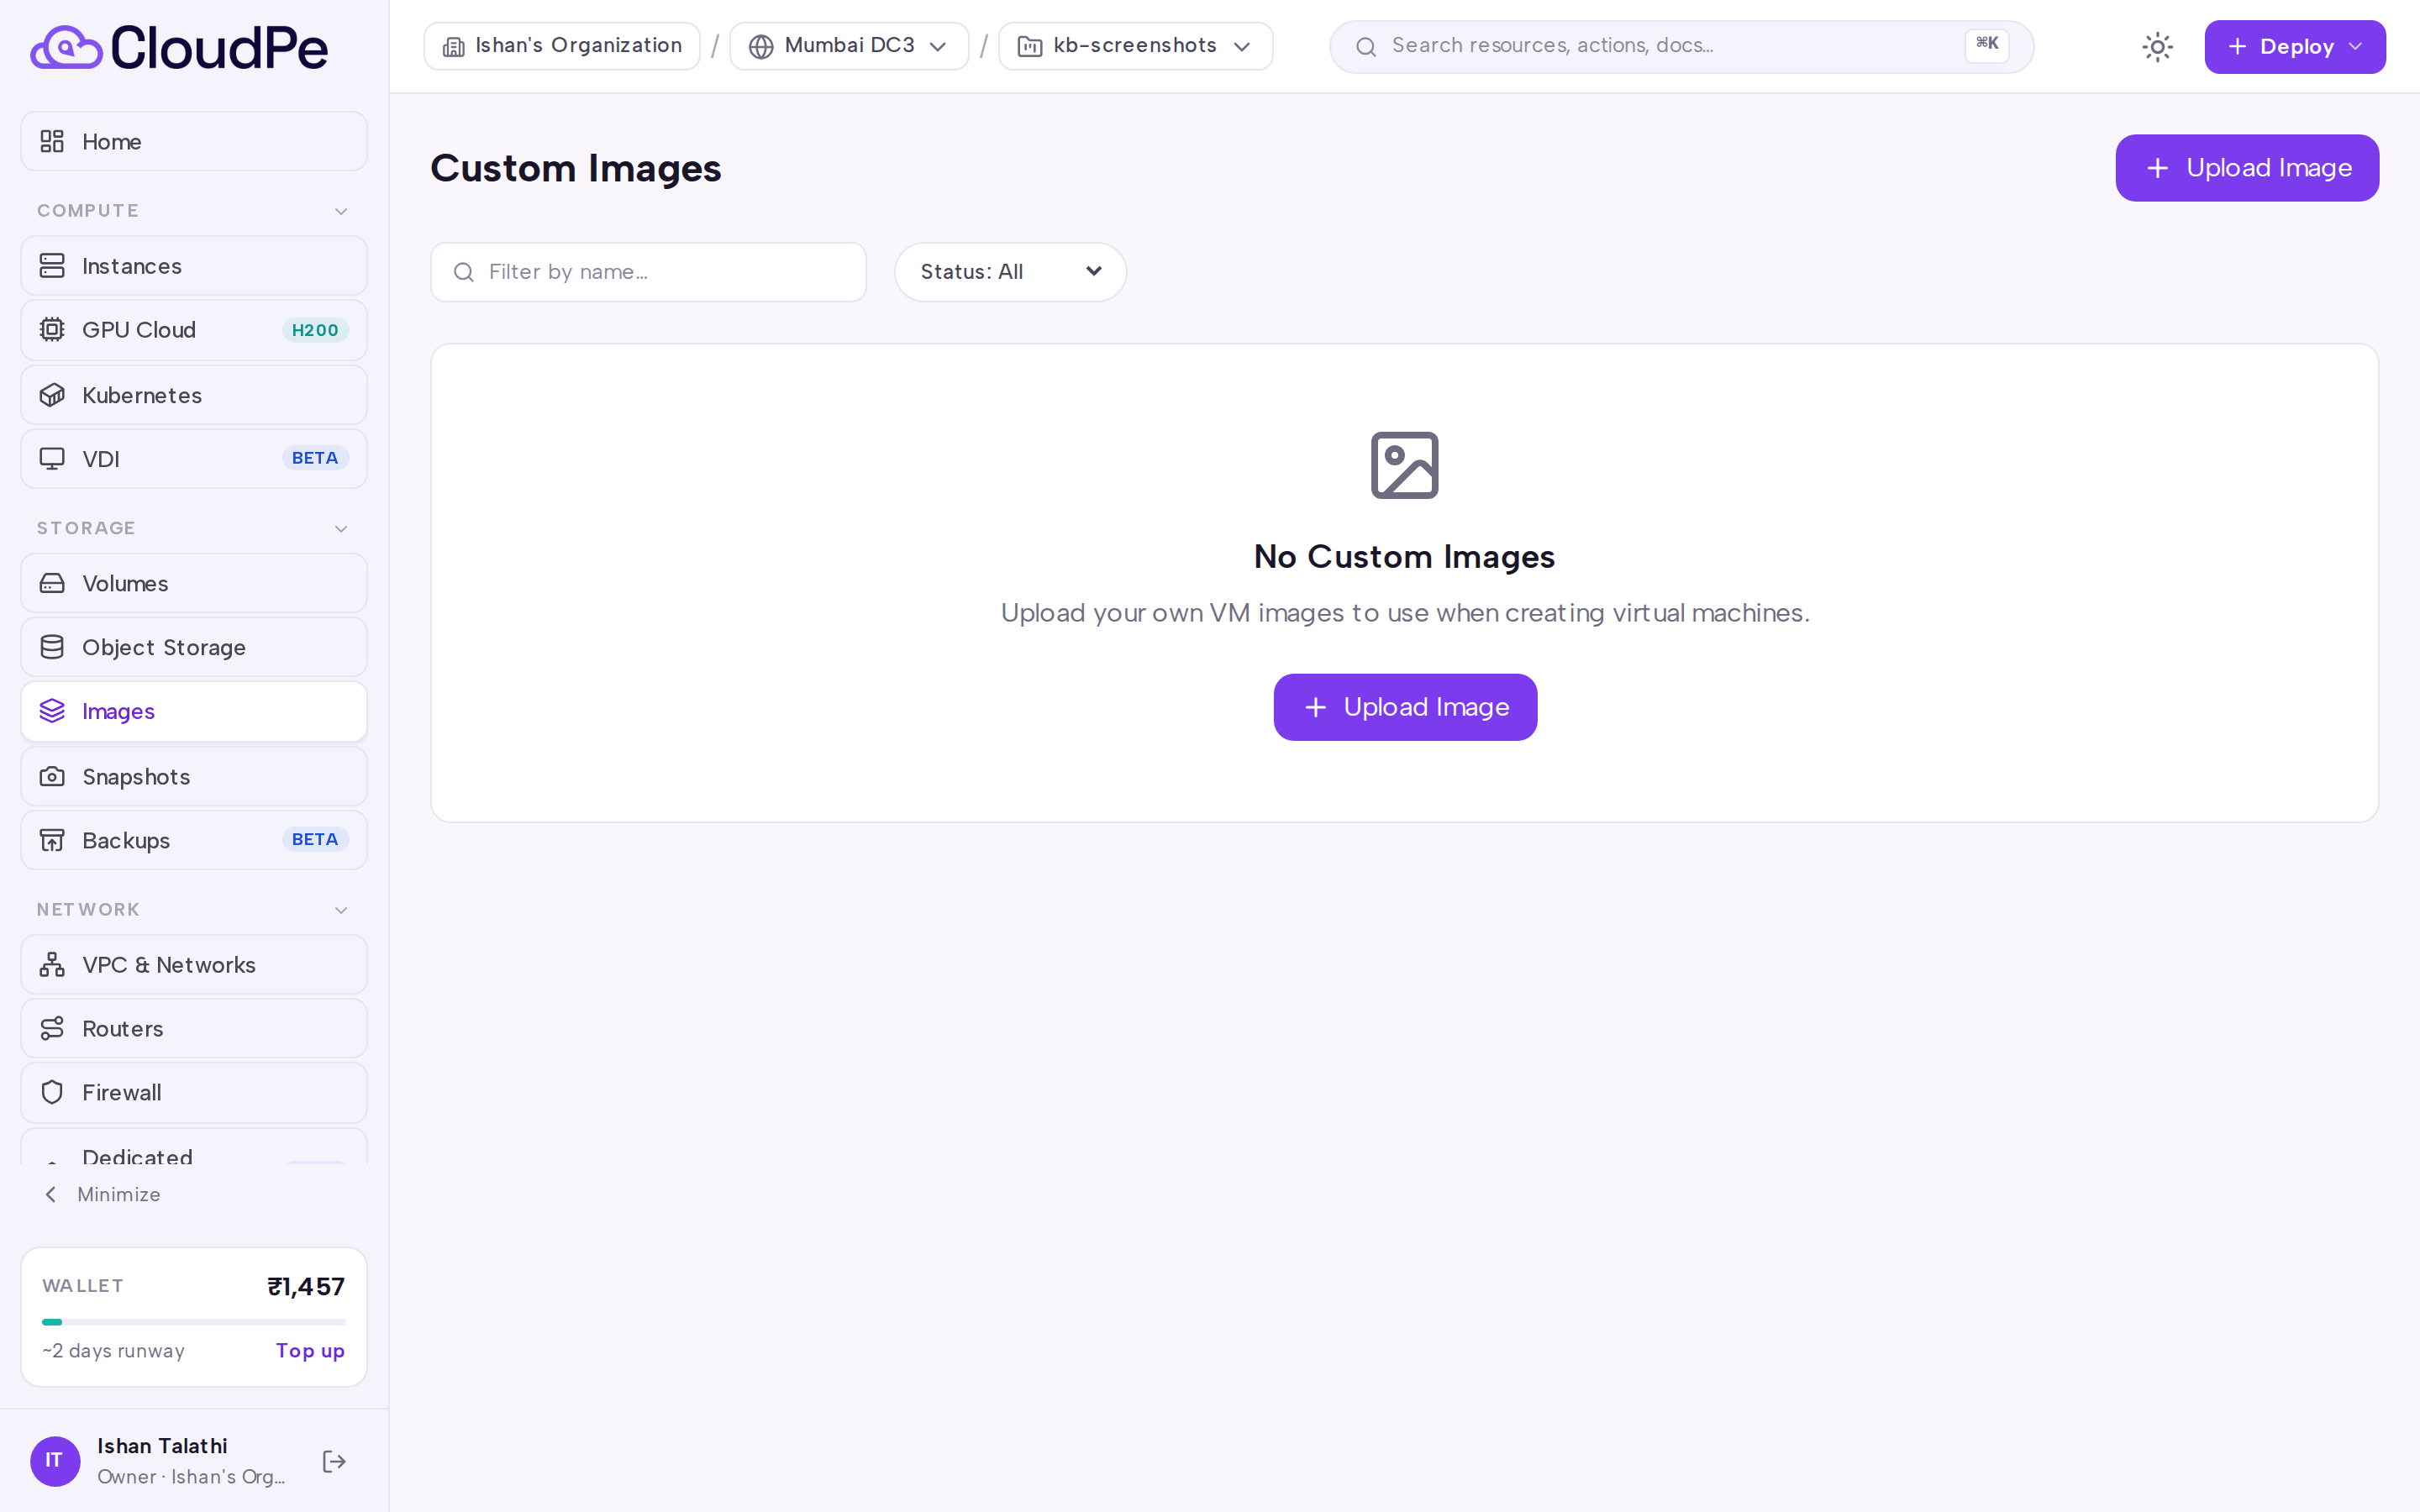
Select Upload Image to open the Upload Custom Image form.
Under Image source, choose how the image arrives:
- Upload File — pick the qcow2 or iso file from your machine.
- Import from URL — paste the source URL for CloudPe to download.
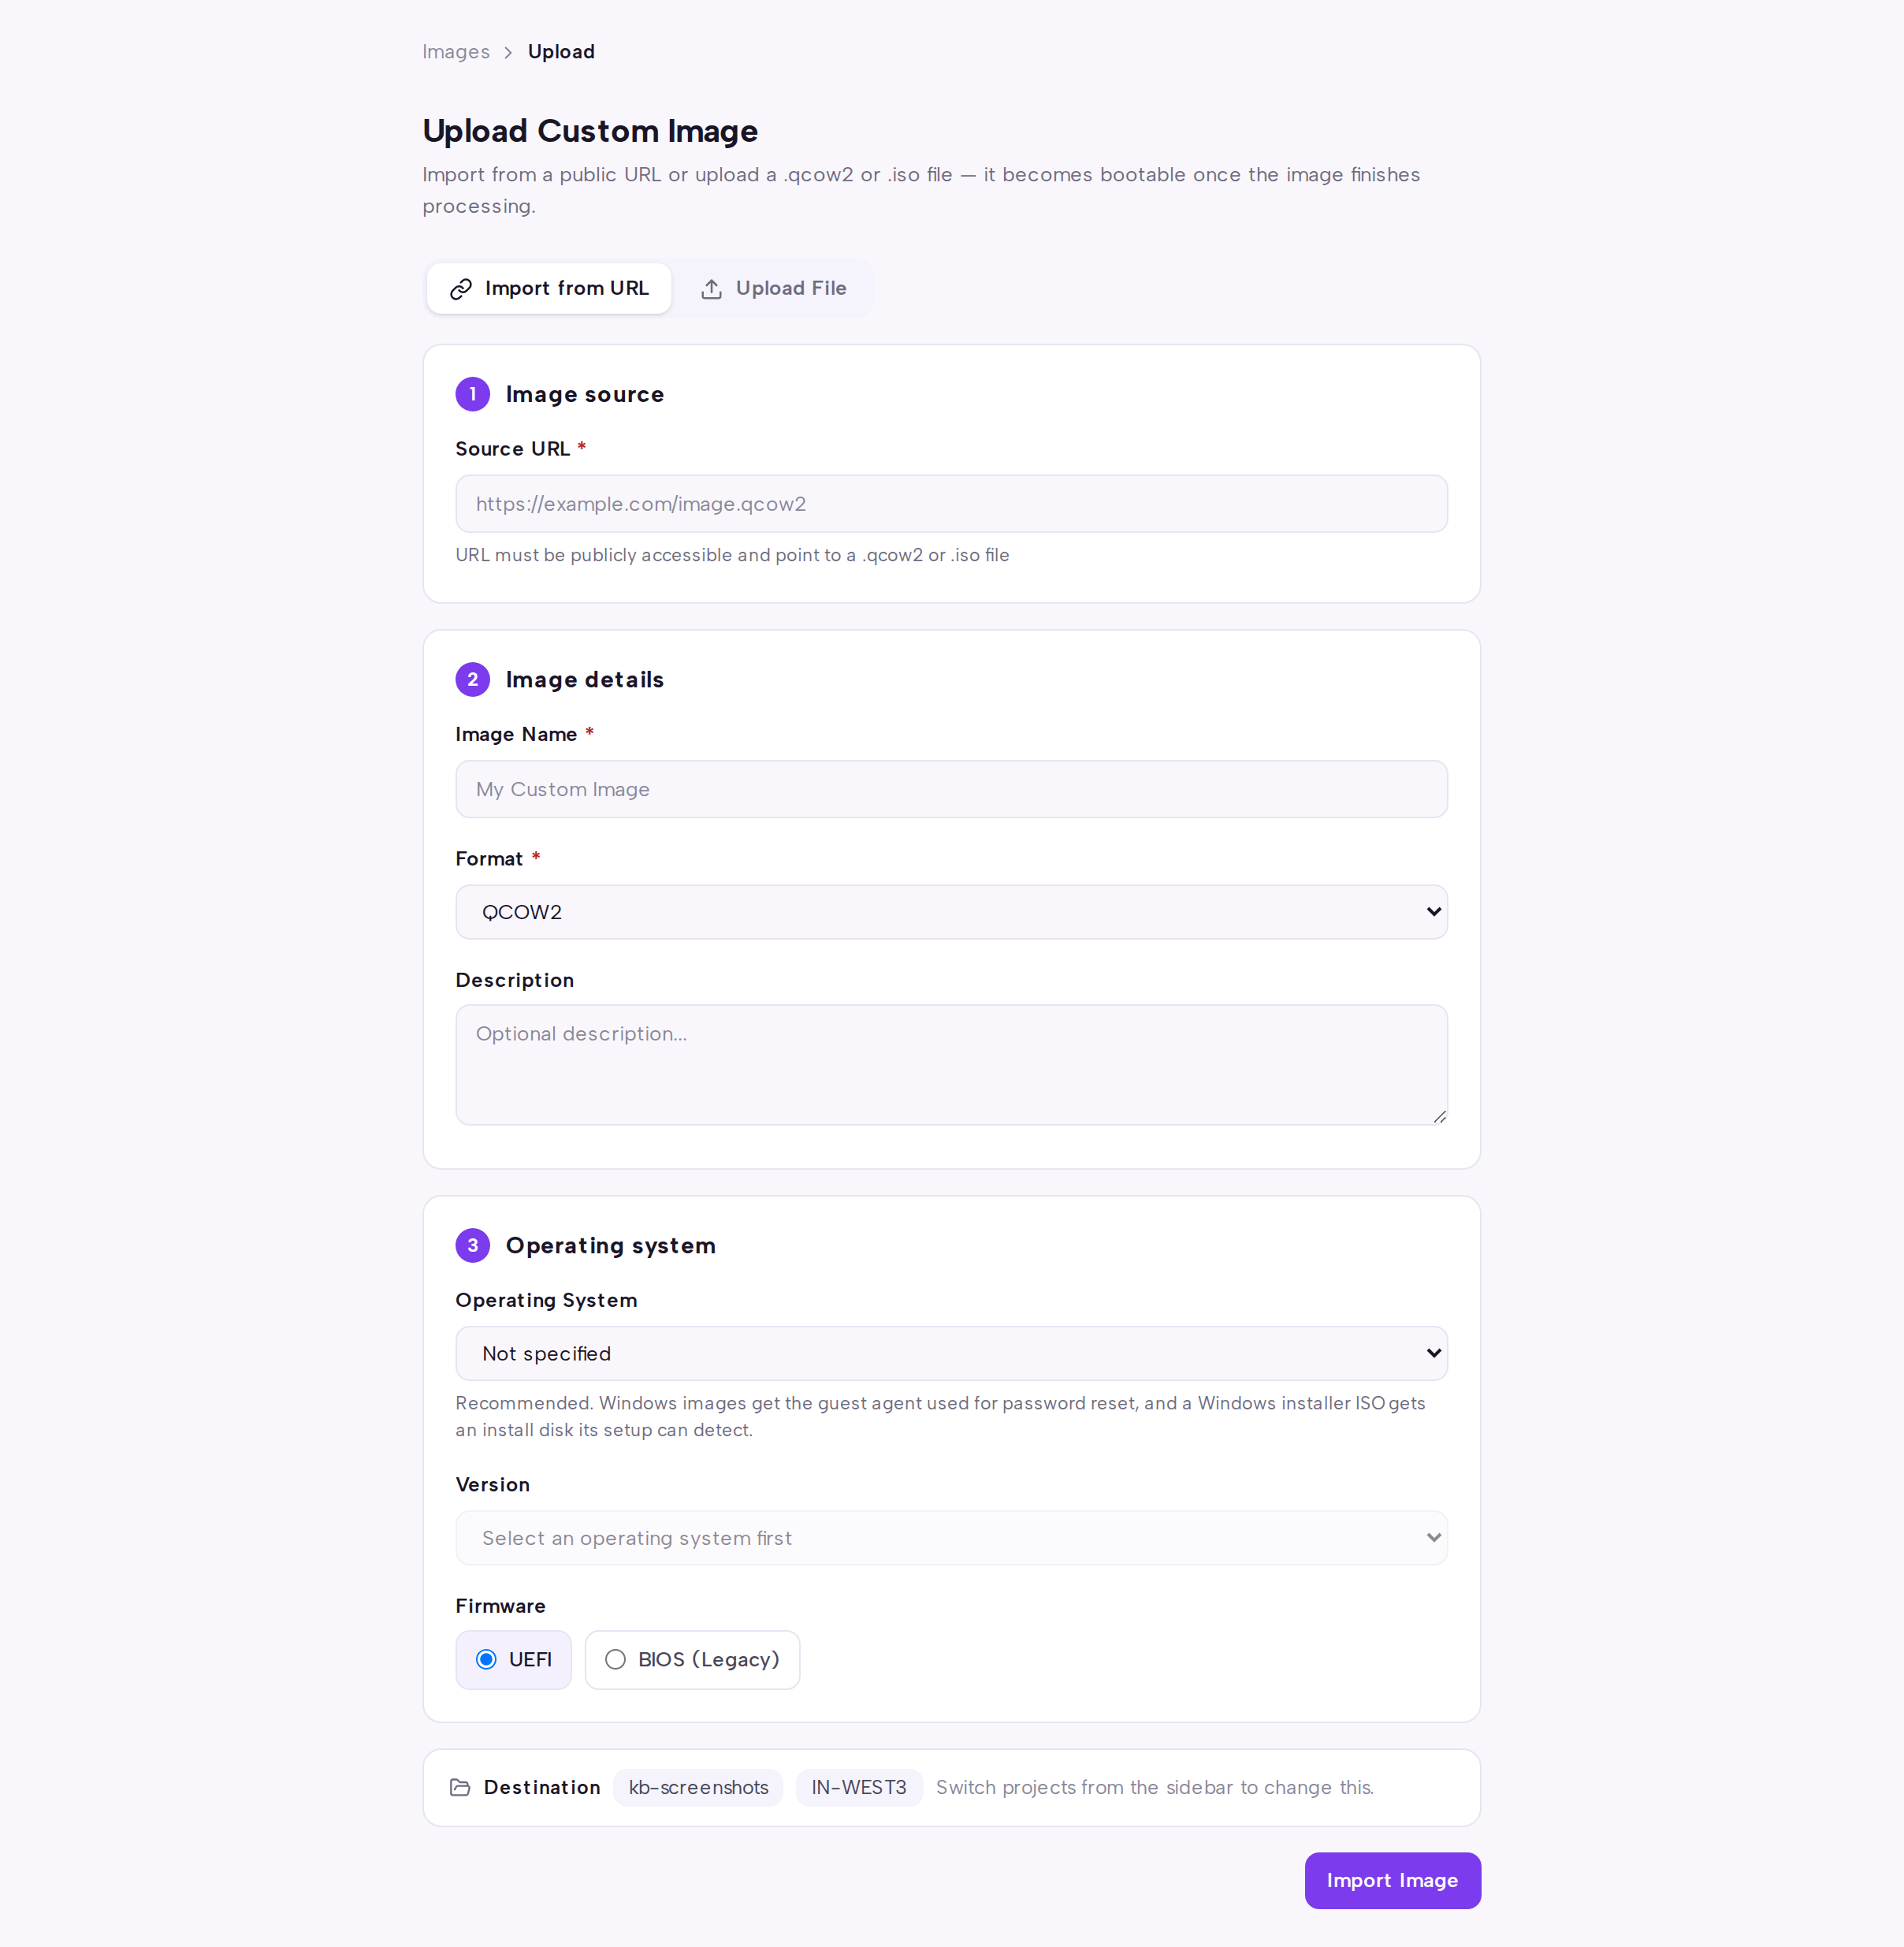
Complete Image details with a name and, optionally, a description. The name is what appears in the instance-create picker, so make it descriptive.
Complete Operating system: select the OS family and version, and the firmware type (
uefiorbios). You can also declare minimum disk and minimum RAM so that only suitable flavors are offered.Select Import Image to start the transfer.
Track progress
Use Status on the Custom Images page to follow the transfer. Uploads and imports move through a series of states before the image becomes active; only an active image can be booted or edited.
Review and edit an image
Open an image from the list to see its detail page.

The Overview tab shows Description, Boot requirements, Identifiers and Timeline. The Properties tab shows the metadata that was written when the image was ingested. You can update the name and description of an active image; OS and firmware metadata is fixed after ingestion — if it is wrong, contact support to have it corrected, or re-import the image with the right values.
Cancel, delete, or share to VDI
- An upload or import that is still in progress must be cancelled, not deleted.
- An active image can be deleted once nothing is using it.
- An image can be enabled for VDI sessions and disabled again later.
API
All calls use the base host https://app.cloudpe.com and a bearer token.
| Method | Path | Purpose |
|---|---|---|
| GET | /api/v1/images |
List images |
| POST | /api/v1/images/import |
Import image from URL |
| POST | /api/v1/images/upload |
Upload image file directly |
| GET | /api/v1/images/{image_id} |
Get image details |
| GET | /api/v1/images/{image_id}/status |
Get image upload status |
| PATCH | /api/v1/images/{image_id} |
Update image metadata |
| POST | /api/v1/images/{image_id}/cancel |
Cancel image upload |
| DELETE | /api/v1/images/{image_id} |
Delete custom image |
| POST | /api/v1/images/{image_id}/enable-vdi |
Enable custom image for VDI sessions |
| POST | /api/v1/images/{image_id}/disable-vdi |
Disable custom image from VDI sharing |
| GET | /api/v1/gpu-resources/images |
List compatible images |
| GET | /api/v1/billing/usage/images |
Get image usage |
Import an image from a URL
curl -X POST https://app.cloudpe.com/api/v1/images/import \
  -H "Authorization: Bearer <API_KEY>" \
  -H "Content-Type: application/json" \
  -d '{
    "name": "golden-ubuntu",
    "source_url": "<SOURCE_URL>",
    "disk_format": "qcow2",
    "description": "Base image for app tier",
    "os_type": "linux",
    "os_distro": "ubuntu24.04",
    "firmware_type": "uefi",
    "min_disk_gb": 20,
    "min_ram_mb": 2048
  }'
name and source_url are required. disk_format accepts qcow2 or iso and defaults to qcow2.
Poll the status
curl https://app.cloudpe.com/api/v1/images/<image_id>/status \
  -H "Authorization: Bearer <API_KEY>"
Rename an image
curl -X PATCH https://app.cloudpe.com/api/v1/images/<image_id> \
  -H "Authorization: Bearer <API_KEY>" \
  -H "Content-Type: application/json" \
  -d '{"name": "golden-ubuntu-v2", "description": "Rebuilt with latest patches"}'
Remove an image
curl -X DELETE https://app.cloudpe.com/api/v1/images/<image_id> \
  -H "Authorization: Bearer <API_KEY>"
For a transfer that has not finished, use the cancel endpoint instead:
curl -X POST https://app.cloudpe.com/api/v1/images/<image_id>/cancel \
  -H "Authorization: Bearer <API_KEY>"
Limits & billing
- Disk formats are restricted to qcow2 and iso. Other formats are rejected at submission.
- Direct file uploads are subject to both a per-file size limit and a per-request envelope limit; the API returns the applicable figure in the error message when either is exceeded. For very large images, prefer the URL import path.
- Image names must be unique per project.
- Custom image storage is reported against your account — retrieve the current figures with
GET /api/v1/billing/usage/images. - When you install from an ISO, the installer media is held as a separate volume and is billed as storage until it is removed.
Troubleshooting
| Error | What it means | What to do |
|---|---|---|
Image with name '{…}' already exists in this project |
Another image in the same project already uses that name. | Choose a different name, or delete/rename the existing image first. |
An image named '{…}' is already being created in this project. Check the Custom Images page for progress. |
A transfer with the same name is already running. | Open Custom Images and use Status to follow the in-flight job rather than resubmitting. |
IMG-021: unknown firmware_type {…} (uefi|bios) |
The firmware value is not recognised. | Send either uefi or bios. |
Image must be active (current: {…}). |
The action you attempted needs the image to have finished transferring. | Wait until the image is active, then retry. |
Complete identity verification to enable images for VDI. |
The account has not finished identity verification. | Complete verification, then retry enabling the image for VDI. |
VDI share cleanup must complete before this image can be deleted. Please retry shortly; if it persists, contact support. |
Sharing records for the image are still being torn down. | Wait a short while and retry the delete; raise a ticket if it keeps failing. |
Image not found |
The image ID does not exist, or is not in the current project or region. | Confirm the ID with GET /api/v1/images while scoped to the right project and region. |
Region not found |
The target region was not resolved. | Re-select the region and resubmit. |
FAQ
Which disk formats can I upload? Only qcow2 and iso. This is a strict whitelist.
Should I upload the file or import from a URL? Both produce the same result. URL import avoids browser upload limits, so it is the better choice for large disk images. Direct upload is convenient for smaller files you already have locally.
Can I change the OS or firmware after the image is created? No. Name and description are editable on an active image; OS distribution and firmware type are written at ingestion and stay with the image. Re-import with the correct values if they are wrong.
Why does Windows Setup say it cannot find any drives? The install target disk is virtio. In Windows Setup, choose the load-driver option and browse the driver disk that is attached to the VM to install the virtio driver, then the disk will appear.
Can the same image be used in another region? No. Images are region-scoped. Import or upload the image again in each region where you need it.
Can I use a custom image for GPU instances?
Custom images can be used where they are compatible with the GPU flavor. Use GET /api/v1/gpu-resources/images to list the compatible images.
How do I stop a large import that is taking too long? Call the cancel endpoint for that image. Cancel only applies while the transfer is in progress — once the image is active, delete it instead.